Tips for repairing a Samsung S10 battery


Tips for repairing a Samsung S10 battery
Samsung S10 series was a huge success in 2019. The main features of these phones were cinematic infinity display, thin and lightweight body, triple camera, modern design, wireless power share, and most importantly reasonable price but unfortunately, this phone had two drawbacks poor battery life and slow fingerprint system.
Here at CellBotics Training, we provide Cell Phone Repair Training and Computer Repair Training so you can repair devices and earn income. Although video tutorials are available on YouTube sometime, they are not accurate. Our training programs are the best for your money.
Some Samsung S10 battery draining issues can be repaired by updating your software. The phone should always be running on the latest software. Rebooting your phone and disabling always-on display is good so that unnecessary information does not consume the battery of your phone. Lowering your screen brightness and adjusting your screen timing setting also will increase your battery use life.
Continuously deleting apps not frequently used also will increase battery life. Using low-resolution of a phone’s screen and power-saving mode has also been found to be helpful. In case all the above methods are used but the battery is still draining fast than the last resort is the factory reset. If battery draining issues prevail then the battery should be replaced.
Step by step Samsung S10 Battery Replacement:
Before replacing the Samsung S10 battery, tests can be performed to show whether replacement is required or not. Testing and testing tools are taught in our Cell Phone Repair Course and can be used on any device. Samsung S10 battery replacement can be difficult for someone not properly trained but our trained Cell Phone Repair graduates average less than 30 minutes for this repair. For the untrained person, it can take 2-3 hours or more.
Things required for Battery Replacement:
The tools required are as follows.
- Hot plate or heat gun
- Pray Tool
- Opening picks/Flat picks
- Tweezers
- Philp 00#Screwdriver
- Spudger
- Isopropyl Alcohol
- Vendors are provided for all of this and high-quality parts when in class

Step 1 Switch off the phone
Before replacing, if you are able too, drain your phone battery below 25% which will reduce the risk of a thermal event in case you puncture your battery during the repair. Switch off your mobile phone, if possible, if not it is ok to proceed.
Step 2 Removal of Back Cover
Samsung phones have a back that is tightly bonded to the frame with strong adhesive. We use heat to remove the Samsung glass back and some alcohol. We will reapply adhesive when we put them back on, but we never guarantee your phone will not be waterproof to factory original standards. Once the original seal is broken it is never to the original seal.
Open the phone by heating the back and putting a suction on the back of the phone and sliding I opener between the back cover and the frame. After that, you need flat picks can put between the gaps so that it glued does not join again. Removing back cover can take time to do it very carefully because the back is made up of glass. In class, we go into more detail about temperatures and proper times to place on the heat for the safest removal.
Step 3 Removing Plastic housing cover + wireless charging pad:
Now remove the 8 screws with a Philips head 00# screwdriver. In class, we teach you proper layout processes to not miss any screws and to not cause screw damage which can be very problematic for the device.
In case a screw does not come out, use a pair of tweezers. Now remove the mid-frame housing with the wireless battery charger pad, it is also glued from the edges you can heat it so that glue is loosened up. Or use spudger from the volume side and try to lift it. It should not be too hard at this point. In the CellBotics Repair Training Course, you get to do this hands-on.
Step 4 Disconnect the battery:
To avoid short-circuit be sure to disconnect the battery before anything else. Then hold the power button for 15 seconds, if possible, to discharge any leftover voltage on the board. Use a flat spudger to disconnect the battery that is placed on the motherboard near the camera. Do not lever down, be very delicate when disconnecting any plug connector, FPC.

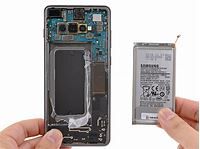
Step 5 Remove the S10 Battery with a pry tool
Now heat the front of the phone slightly and/or just use 100% alcohol around the battery edges. The alcohol will deteriorate the adhesive and make it easier to remove, in most cases heat is not required, just a little patience.
Do not use direct heat to the battery it can damage the battery but more of an issue is if the heat is applied to long and too high directly to the battery it can catch on fire. Now pry the battery out with a plastic pry tool, do NOT pry on the side where the motherboard is exposed pry up against the frame side.
Step 6 New Battery installation
The old battery is glued around the edges remove the old adhesive and any alcohol left over. Connect the battery to the battery connector then lay the new battery into place. It should have come with adhesive applied. Now work backward. The way you took the device apart, it goes back together.
We hope these steps helped with the repair. However, no steps or video will do training better than a CellBotics Cell Phone Repair Training Course, you can repair Samsung S10 battery issues and so much more after our course. Come on down and see us!
Thank you for reading my blog!
Nicole Russell
Cell Phone Trainer and President of CellBotics

Check out these pages:
https://cellbotics.com/cell-phone-repair-training-reviews/ , https://cellbotics.com/cellbotics-partnership-and-icracked-partnership/ , https://cellbotics.com/videos-from-the-trainers/ or Register for our class here: https://cellbotics.com/cell-phone-repair-courses-all-schedules/ and be sure to signup for our Ebook and discounts: https://cellbotics.com/cellbotics-landing/


